Using Airtable with Dialogflow to build a chatbot
Dialogflow-Airtable Example
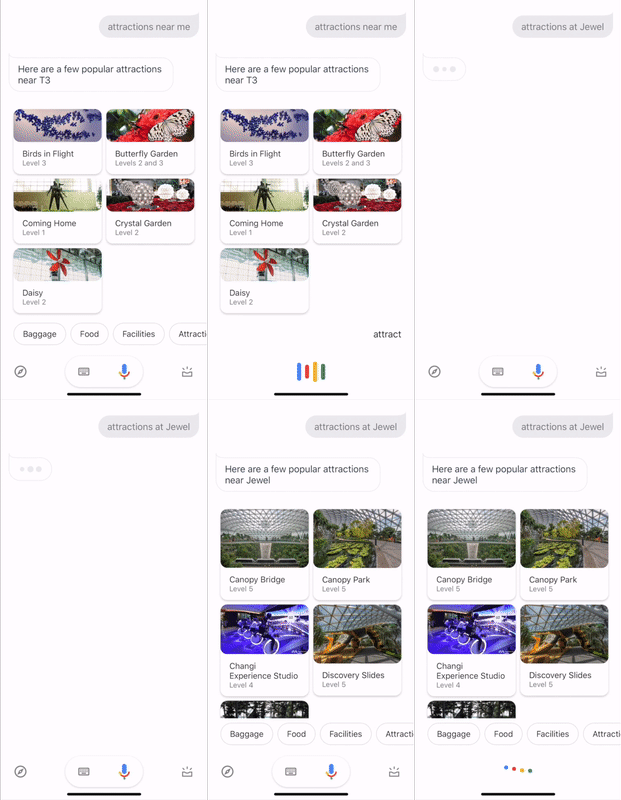
An example to demonstrate how you can use Airtable as the database for a dialogflow chatbot. The example chatbot can respond with the different Attractions available in Changi Airport based on the location.
Introduction
Airtable
If you haven’t already heard about it, Airtable combines the best of both a spreadsheet and a database. It provides an easy to use user interface to add/edit/delete data and also exposes an API for backend applications to query. Using Airtable saves a LOT of time (compared to writing SQL queries and hosting the database on server etc.). Apart from the time saving, another reason you might want to consider Airtable is that demands no special knowledge (like RDBMS / NoSQL / SQL) etc. to work with it; it can just be used like a spreadsheet. Ofcourse it has it's disadvantages compared to traditional databases like API hit limits, but it's good for a few use cases.
Dialogflow
You probably have heard of dialogflow if you’re reading this, but for the uninitiated, dialogflow provides an excellent NLP engine that takes care of the intent and parameter extraction from sentences. It also allows us to add a web hook that can make use of a backend server to respond dynamically.
Getting Started
These instructions will get you a copy of the project up and running on your local machine for development and testing purposes. Although if you want this to work with Google Assistant, you would have to deploy it on a live system or use a tool like ngrok to expose your local web server. See deployment for notes on how to deploy the project on a live system.
Clone Repo
Go the this github link and clone the example repository.
Initial Setup
- Dialogflow Setup
- Create an account or login in to Dialogflow and create a new agent with the name
Changi-Attractions - Click on the agent settings (gear icon) and go to
Export and Importtab and click onImport from ZIP - Select the
Changi-Attractions.zip(in the Dialogflow folder) and import it into dialogflow - Explore the the
intentsandentitiestab
- Create an account or login in to Dialogflow and create a new agent with the name
- Create an account in Airtable and create a new workspace. Click on
Add a baseandimport a spreadsheet, import the .csv file (in the database folder) and name itChangi. - Open the created base and you can see the sheet name as
Imported table. Change it toAttractions. - Retrieve API keys from Airtable
- Account API key: go to (https://airtable.com/account) and find your airtable account API key
- Database key: go to (https://airtable.com/api) and select 'Changi' and find your base API key
- Save these API keys as we would need them in the .env file later
Installing
npm install
touch .env
- Now, open the .env file and paste the following
# Your Airtable API key. It'll look like key123asdf123asdf
AIRTABLE_API_KEY=

# Your newly created base ID. It'll look like app123asdf123asdf
AIRTABLE_ATTRACTIONS_ID=
- Paste the API keys we copied earlier into their respective places and save the file
Running on local
node server.js
# if you want to set breakpoints and inspect the code
node --inspect server.js
You can now send POST requests to this server to debug and test how the code works. Although if you need to use it with Google Assistant, you will need to deploy it on a live system.
Deployment
1️⃣ Step 1
Option 1
Install a tunneling software like ngrok (https://ngrok.com/) to get a public URL for your localhost.
Option 2 (Recommended)
A better option would be to deploy it on a real live server. One of the easiest way to do this would be
deploying it on glitch.
- Make an account or login to glitch
- Go to this glitch link and click on
Remix to editso that you can clone this project to your account - Follow the Initial Setup section of this document and paste the API keys in the .env file in glitch. Note that the .env file is already present in glitch by default and you don't need to create a new one.
2️⃣ Step 2
Copy Webhook URL
- If you've used the ngrok method, copy the public url form the console.
- If you've used the glitch method, copy your live glitch link URL (by clicking on Show -> In a new window)
- Paste it into the the Webhook URL in your Dialowflow Agent Fulfulment Tab (instead of the
https://gaudy-coral.glitch.me/). The Dialogflow agent will now use your server on glitch as the backend. Make sure to save your changes.
Using it on Google Assistant
- In the right hand side of your Dialogflow agent page, you can find a a test area. Click on
See how it works in Google AssistantThis will open the google assistant console. - Click on
Talk to my appin the chatbot simulator to start chatting with your Changi Attractions Bot. You can ask the following phrases :
attractions near me
attractions near T2
attractions near terminal1
attractions near jewel
things to see in t2
Explore the Attraction intent in your Dialogflow agent to find what other phrases you can ask. You can also add more training phrases. Make sure you
tag the airport-location entity if you want to filter based on location.
Demo
💃💃💃 Talk to the bot! 🕺🕺🕺

Links
- Github Link - Project Github page
- Glitch Project - Example application running on glitch
- Glitch - Glitch website
- Airtable - Airtable website
- Dialogflow - Dialogflow website
- SIA Assist Chatbot Link - Airport Assistant bot built by me and my team for cognitive systems class project. Glitch Link
